Publishing to RStudio Connect with Google credentials

googledrive, googlesheets4, and RStudio Connect
Inspiration for this post
As a data scientist, I frequently need to pull data from disparate sources and combine it in an automated fashion for other teams to access. Google Drive is one of the main places where data is stored. I use the googledrive and googlesheets4 packages to access this data regularly. It’s fairly simple to use these packages when working in your RStudio console locally: there is a great vignette for googledrive here and one for googlesheets4 here. It is slightly more complicated, however, to use these packages in a “non-interactive” context, e.g. rendering an RMarkdown locally or deploying an RMarkdown or other data product to a remote server. What follows are some steps that I’ve used to be able to use these packages in these situations so that I can pull data from Google Drive in a replicable and automated way and publish the resulting products to RStudio Connect. Note, these instructions are particularly for the use case where you are deploying your R product remotely, specifically to RStudio Connect. If you just want your RMarkdown to render locally, you only need to complete the steps “Creating a .secrets file” and “Authorize your packages in the code”.
Creating a .secrets file
In order to authenticate with Google Drive and store that authentication for non-interactive runs (like having a Shiny app deployed on a server), you need to create a .secrets file for each of the packages you are using (googledrive and/or googlesheets4). This file will store your credentials so that R knows who you are from the perspective of Google Drive and will allow your code to access your Drive accordingly.
To create a secrets file, you must first set your project options in your .Rprofile accordingly. To create an .Rprofile, run file.edit(".Rprofile") in your console the first time, making sure that you are inside the desired folder for the document you are trying to knit / publish. (You can check your folder location using getwd() before creating the .Rprofile if you are unsure.) After the file is created, you can open it from your file browser and edit it just as you would any file in RStudio.
options(gargle_oath_cache = ".secrets",
        gargle_oauth_email = "babichmorrowc@gmail.com", # Replace with your email!
        gargle_oob_default = TRUE)
Next, you have to manually authorize each package you are using individually in your RStudio Console to generate the .secrets file. For googledrive, you can run drive_auth(). For googlesheets4 use gs4_auth(). You shouldn’t need any other arguments since you specified them in your .Rprofile, but if you want, you can run with the same arguments:
# Authorize googledrive
googledrive::drive_auth(email = "babichmorrowc@gmail.com", # Replace with your email!
                        cache = ".secrets",
                        use_oob = TRUE)

# Authorize googlesheets4
googlesheets4::gs4_auth(email = "babichmorrowc@gmail.com", # Replace with your email!
                        cache = ".secrets",
                        use_oob = TRUE)
When you run each of these, a browser window should open asking you to authorize. You’ll then have to copy the authorization code and paste it back into the console of RStudio.
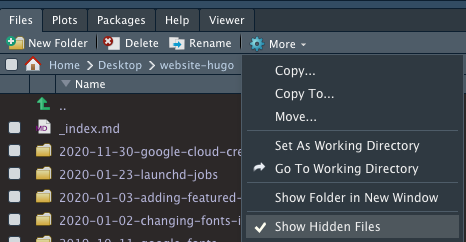
After doing so, you should have generated files in a folder called .secrets. To check, you can either run list.files(".secrets/") in your console, or display hidden files in your file browser as below to verify that the files have been generated:

Publish with .secrets to RStudio Connect
Once you have the .secrets file(s), you just need to ensure that they are published along with the document yourself. When you publish the document, select “Add More” files. When the file browser opens, you can use the Cmd + Shift + . shortcut to display hidden files (this shortcut works for Macs – for Windows, I would try one of the options presented here, let me know in the comments what works!). Select each of the .secrets files you need, and then publish.
Note, if you specified options only in your .Rprofile and not also in the code, you will need to ensure that you include the .Rprofile in your published documents.
Additional resources
I found the additional resources helpful when using these packages in non-interactive contexts: